
 A number of people are using Tone Maps as part of their image processing. The Photoshop Master J-P Metsaivainio may have invented the technique, or perhaps he just popularized it with his spectacular images. Subsequent imagers have developed processes to implement Tone Mapping.
I spent many hours trying to remove the stars from an image. My process is mostly performed within PixInsight, although the last step requires the Spot Healing brush in Photoshop.
Target Image Preparation
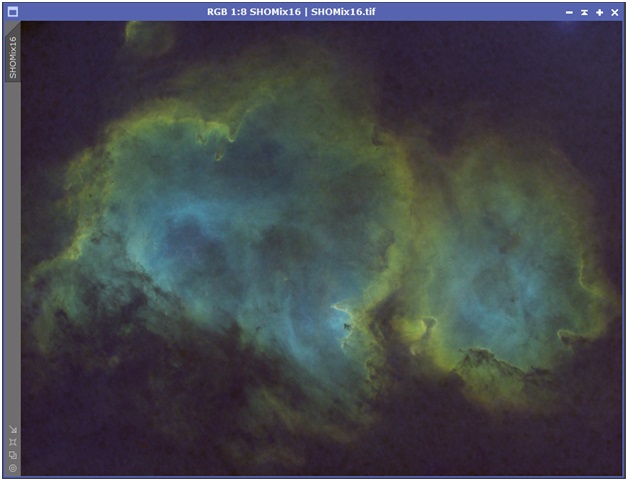
First, create the usual S-II, HAlpha, and O-III masters from calibrated subframes. Mine are drizzled from an SBig STF8300M camera on a Takahashi FSQ106ED. Each master is cropped and has DBE applied.
I then use PixelMath to combine S-II, HAlpha, and O-III masters using the following mixing:
- Red = (0.8 * Sii) + (0.2 * Ha)
- Green = (0.8 * Ha) + (0.2 * Oiii)
- Blue = Oiii
Apply Background Neutralization, TGVDenoise, and a standard Histogram stretch to the RGB image.
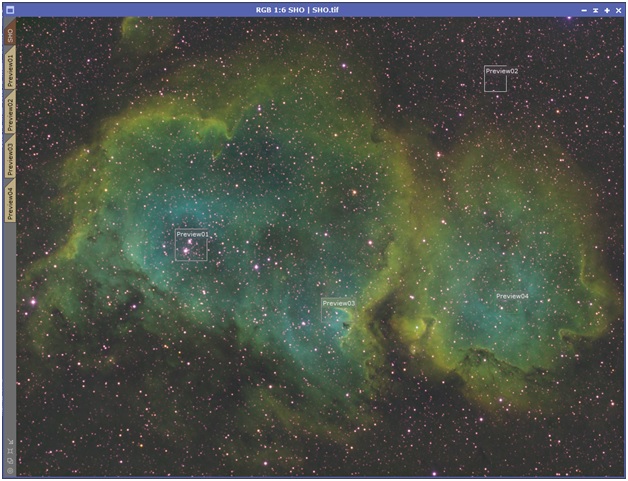
Star Removal Process
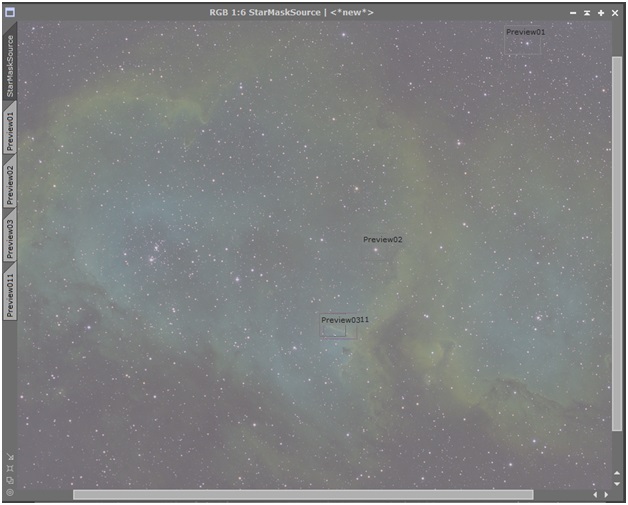
Create several previews on the image. Include areas with bright stars, background areas, strong nebulosity, and so on.
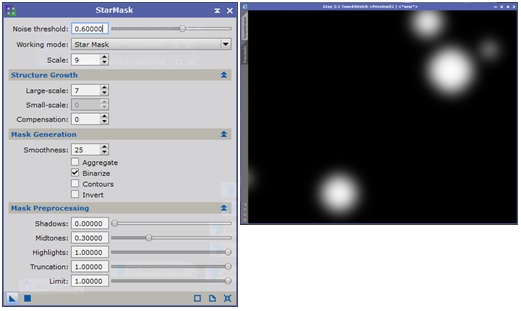
When each star mask is being created, test the mask thoroughly on the previews by applying Morphological Transformation. It takes me many iterations to get the star mask correct. Issues to watch for:
- If the mask stars are too small you will get halos where the star is not removed far enough out.
- Too many iterations of Morphological Transformation through the mask will create dark holes where the star was.
- Is the Tone1Mask including the very small stars? If not, play with Noise threshold or Small-scale Structure Growth. Tone1Mask will likely NOT pick up larger stars.
- Tone2Mask should ignore smaller stars. Check the biggest stars to verify they are being picked up.
- Tone2Mask needs Large-scale Structure Growth to ensure the mask is much bigger than the stars.
- Watch for bright nebulous areas being interpreted as stars, especially along sharper ridges or filaments.
- Watch for strange artifacts in the vicinity of dark dust lanes, blobs, or “holes” in the nebula.
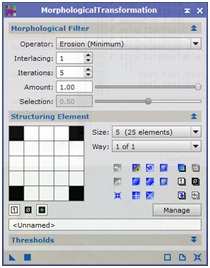
Test the Morphological Transformation through the masks on your previews on the image (the mask should show clear stars). You may need to either
- Run Morphological Transformation / Dilation to expand the mask. Usually 1 or 2 iterations are enough.
- Increase / decrease the number of iterations in the erosion.
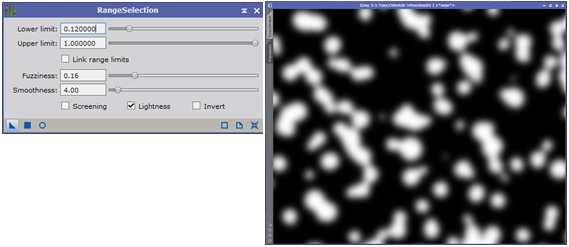
Create Masks
Create two masks. Tone1Mask is intended to cover smaller stars. Tone2Mask is intended to cover larger stars.
Clone the RGB image to make StarMaskSource. This image serves as the source for the two masks. It is already stretched, so StarMask should work well.
Tone1Mask

This StarMask setting generated a star mask which picks up the smaller stars. Note that large stars may not be picked up at all. The dimmer ones need to be brighter so the smallest stars are appropriately affected by the removal process. Run the Range Mask step to brighten the dim star areas.
Tone2Mask
Run HDRMultiscaleTransform on StarMaskSource. This reduces the effect of nebulous areas on the star mask.
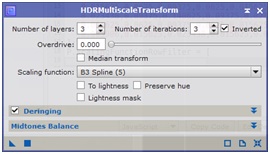
Run StarMask below to generate the Tone2Mask. Verify that all of the big stars are masked; sometimes a big star is not actually as bright as others and can be missed. Try to only get the big stars in the mask, not intermediate stars that have already been removed by Tone1Mask. It might be a good idea to use the image after Tone1Mask has been applied; I have not tried this.
Remove Stars
Now back to the image ready for star removal.
When the previews look OK, apply Morphological Transformation through Tone1Mask to the main image.
 The small and medium stars should be gone.
Change the mask to Tone2Mask and apply Morphological Transformation. Again, test on the previews first to make sure it works OK. You may need to change the number of iterations in Morphological Transformation to avoid putting dark holes where the stars were.
Many people combine the masks into a single mask. I use two masks because each mask can require different numbers of iterations. In this case I ended up using 7 iterations. This removed most of the stars without producing black holes.
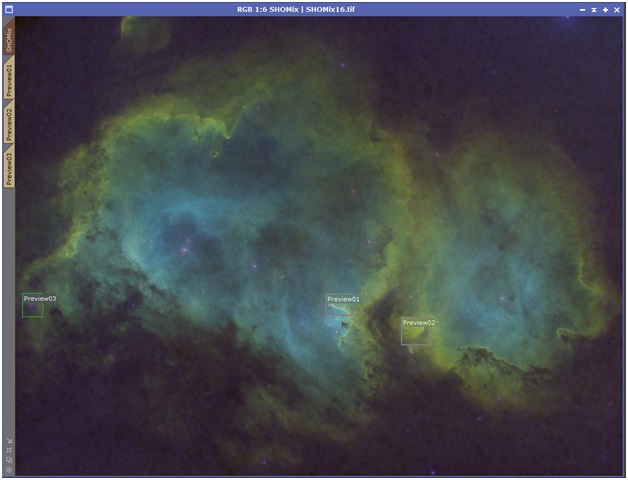
The image still has some large star remnants, which we will remove in Photoshop.
Save the file as a Tiff for Photoshop processing.
Specify 16 bit unsigned integers! My version of Photoshop does not allow tools to work on 32 bit integers, so I have to convert the image to 16 bit in Photoshop. When this 16 bit file is brought back into PixInsight the colors are different. Saving from PixInsight in 16 bit integers in the first place preserves the colors across Photoshop.
Photoshop Processing
The goal here is to remove the remaining very large stars.
Open the tiff image in Photoshop. Select the Spot Healing brush. Set the brush to be bigger than the target star by perhaps 30%; the circle wants to be significantly larger than the star.
Zoom in on the image. Find the bright stars and click the brush on the star to remove it. Hopefully there are not too many stars remaining. You may want to change brush size for larger / smaller stars.
Note: J-P Maisvainio has a prior step where he applies Dust & Scratches filter many times to remove the smaller stars. This appears to be the equivalent to my Morphological Transformation steps.
Save the tiff file back to disk (still 16 bit unsigned integer) and reopen in PixInsight.