Table of Contents
Introduction
TheSkyX Features Needed
Scheduler Features
Tutorial
Introduction
ACP Scheduler from DC3 Dreams does a great job of allowing users to input imaging plans for an automated observatory.
However, it doesn’t take long before you have a lot of projects entered, and would like to view the targets in a planetarium program like TheSkyX. This allows you to see
- Projects that might be imaged tonight. Due to the complexities of constraints and the operation of the dispatcher you don’t know that they will be imaged, but you can see they would be available in the sky.
- Areas of the sky without targets, so Scheduler will definitely not have anything to image those nights.
This utility allows the user to add their ACP Scheduler Projects to the My Chart Elements list in TheSkyX, making the projects viewable on the TheSkyX’s Sky Chart.

TheSkyX Features Needed
TheSkyX provides 2 features critical to this process.
My Chart Elements
TheSkyX allows users to create a list of objects or locations in the sky with the My Chart Elements tool. The list is viewed and managed by the menu selection Input/My Chart Elements. An example list is shown in Figure 2.
There can be some confusion between two pieces of TheSkyX with similar names:
- My Chart Elements, the list of user designated points in the sky, and
- Chart Elements, the tab on the left of the screen that manages the display of various objects on the Sky Chart.
An object is added to the list by Ctrl-Left Click at the desired spot on the Sky Chart. This creates a Reference point, which can then be edited to change the object type, label, and so on.

This is the basic My Chart Elements screen. Selecting an element in the list and clicking the Edit button brings up the Element Editor screen below.

Edit existing entries here. You can add new entries if you happen to know the RA/Dec; I find it easier to Ctrl-Left Click on the desired spot on the Sky Chart to automatically pick up the RA/Dec.
Notice the Object Type field. By default an added point is a Reference Point; I have changed this one to a Type 2 element. You can use up to 20 Types to classify different objects. SchedToSkyX will use object types to designate Scheduler targets.
Chart Elements / My Object Types
The second feature used is My Object Types, defined within the Chart Elements tab.

The Chart Elements tab allows the user to select what elements are displayed on the Sky Chart, and how they are displayed. Double clicking the Type 1 entry brings up the Attribute editor to allow changing font, color, and shape for only the Type 1 objects.

I happen to use two Type entries.
- Type 1 objects are possible wide field imaging targets
- Type 2 are narrow field targets using a different telescope and camera.
In this example Type 1 targets are marked with larger yellow squares and yellow text. Type 2 targets are marked with smaller green squares and green text.
Here is a piece of the Sky Chart showing my Type 1 and 2 targets.
The green Type 2 targets are NGC7023 and Caldwell IC 12. Type 1 targets are Sh2 129 and IC 1396.
Scheduler Features
The primary Scheduler feature used is the ability to export the current database. Clicking the “Export Database…” menu item brings up a typical File Dialog. Simply specify the folder and file name, and Scheduler exports the database in xml format.
It may be a good idea to regularly export the database in any event, in case something odd happens to the actual database. It is important to pick a folder and file name for this exported file. For example, put the file in a Dropbox folder so it automatically is backed up to the Dropbox servers. Name the file something like SchedulerBackup-20200402.xml. It may get confusing after awhile as to what each export was for, so a good naming pattern is important.
Tutorial
You may already use My Chart Elements to track objects for purposes of your own. This might include Reference Points to show the telescope’s Home position, or the position for taking panel flats, or the Herschel 400 objects as Type 2 objects. You will want to include your existing elements when you add in the Scheduler targets.
The Scheduler projects are exported to Type 10 or higher objects in My Chart Elements. So, when SchedToSkyX adds the Type 10 objects, we will save all other elements while deleting objects of Type 10, Type 11, … In this way, if you are using Type objects yourself, those will be saved as long as they are less than Type 10.
Note – this means you cannot use Type 10+ objects for your own purposes! If you have any, you need to change them to Types below 10. Otherwise these will be deleted.
Again, it is important to consider file naming conventions. In this case there are two My Chart Element files, before and after the merge with Scheduler projects. In this example I will call the two files BeforeMergeElements.txt and AfterMergeElements.txt. By default TheSkyX puts these in the folder Documents\Software Bisque\TheSkyX Professional Edition\SDBs. You are free to use whatever naming convention works with your work flow.
The default location of these files can be changed using the button at the bottom of the next screen. This allows placement of the files in Dropbox or other folder which is automatically backed up.
Step 1. Save Current My Chart Elements
Even if you have no My Chart Elements entries, you still need to export the “empty” file. The file contains header information needed for the new AfterMergeElements file to be created. Export the file with the screen shown.

Notice the use of the second tab at the top of the form, and the Export button in the middle. Export the file to BeforeMergeElements.txt.
If something weird happens later, this file can be re-imported back into TheSkyX to restore your My Chart Elements.
Step 2. Export Scheduler Database

Run the Scheduler Browser (not the web version). Use the Data/Export Database menu entry to create your exported file. In this example, it will be SchedulerData20200429.xml.
Step 3. Run SchedToSkyX

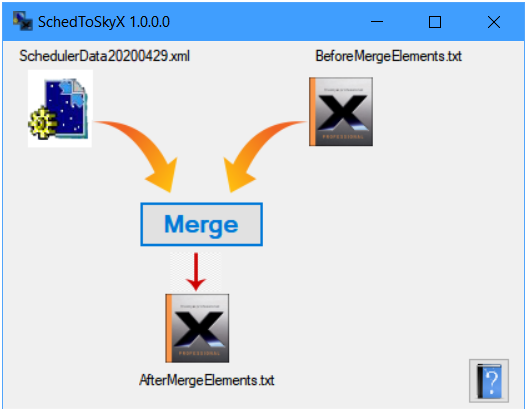
The Main screen of SchedToSkyX shows 3 files. If they are not correctly specified you see the Not symbol and the Merge button is not enabled, as seen in Figure 8.
Select Scheduler data
Click the Scheduler icon to select your Scheduler data (SchedulerData20200429.xml in this example).
A couple of notes on this screen:
- An immediate left click on an icon provides the file dialog for specifying the file.
- Hovering on an icon provides a status screen showing characteristics of the file. For example, hovering over the Scheduler data shows the number of Projects in the file, the last modified date, and help on how to use this file. When you move the mouse this window closes.
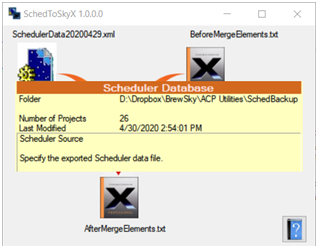
- Left clicking the Book Icon at the lower right brings up this document in your web browser.
Select Input My Chart Elements
BeforeMergeElements.txt is required even if you do not have any My Chart Elements.
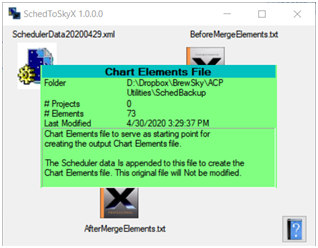
Click the upper right TSX icon to specify the location of the input file. In this example I have named it BeforeMergeElements.txt.
Hovering shows the file has 0 Scheduler projects and 73 other elements.
Select Output My Chart Elements
Click the lower TSX icon to specify the location of the output file. In this example I have named it AfterMergeElements.txt. If the file already exists you are prompted to overwrite it.
When all three files are correctly entered the Merge button will be enabled. The screen should be similar to Figure 11. Click the Merge button to create the output file.
The Scheduler Projects have been merged into the original entries as Type 10 or higher elements. Prior Scheduler Projects in BeforeMergeElements, if any, are deleted and replaced by the current projects in SchedulerData20200429.xml. In addition, Types 11, 12, and so on are removed. If you are using Type objects yourself, those will be saved as long as they are less than Type 10.
Why Greater than 9?
I have written a Scheduler constraint in where I can specify Types for my projects. As mentioned earlier, I run my setup as either Type 1 objects (Wide Field) or Type 2 (Narrow field).
When I export the database, projects will have the following Types:
- Unspecified Constraint: the default Type 10 project.
- Type 1 Constraint: Outputs as Type 11.
- Type 2 Constraint: Outputs as Type 12.
Thus, when I update Chart Elements with the Scheduler projects I need to replace all Type 10 and above objects.
Note: this means you should not use Types 10+ for your own devices; these will be deleted by the merge process.
Step 4. Import My Chart Elements into TheSkyX
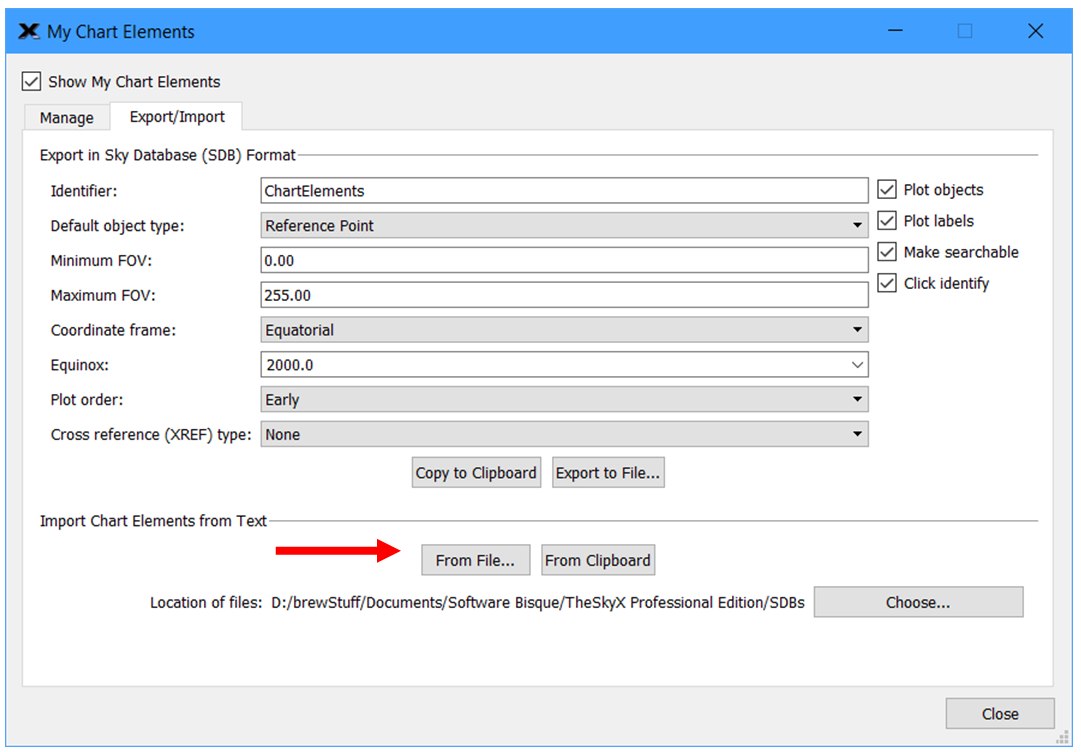
Now we need to let TheSkyX know about our new elements.
Return to the Import/Export tab for My Chart Elements (via Input/My Chart Elements). Import the newly created file (AfterMergeElements.txt in our example).
Step 5. Configure TheSkyX Display
After the new My Chart Elements are loaded, they do not yet display on the SkyChart. We need to set up TheSkyX to display Type 10 entries.
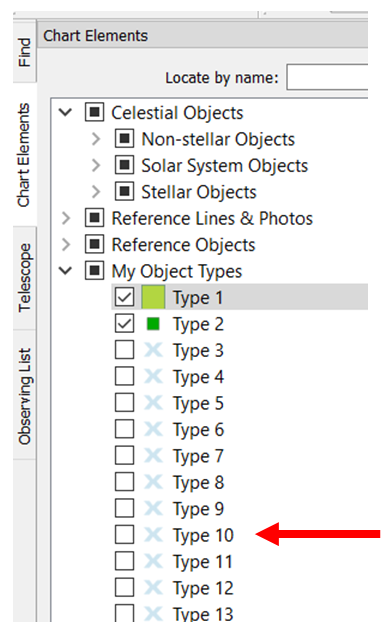
This Chart Elements tab (not My Chart Elements!) shows that Types 1 and 2 are set up. Yours will not be unless you are using Types for your own purposes. As mentioned earlier, I use Type 1 and Type 2, so these happen to be set up previously.
The Scheduler objects will be Type 10 data. Type 10 is not enabled in the list. Enable the checkbox for Type 10. You should see your projects displayed with light yellow labels and an off white X symbol.
Now double click the Type 10 entry to get the dialog to edit the Type 10 attributes.
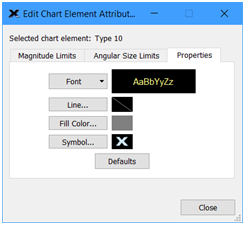
- The Font dropdown allows selection of the label colors. In this example I selected a cyan color.
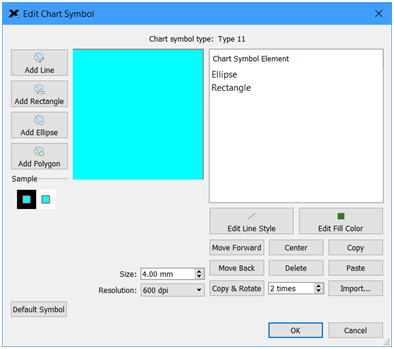
- Clicking the Symbol… button brings up a simple image editor; by default it shows a polygon image of an X.
- Click “Delete” to clear the X
- Edit Fill Color to select the same cyan used in the font
- Click Add Rectangle to get the rectangle shape. Note the corners are used to drag the rectangle to the desired size.
You can play around as desired.
Click OK, and your scheduler objects will be visible on the Sky Chart.
Note: this configuration only needs to be done once, not every time you re-import My Chart Elements.
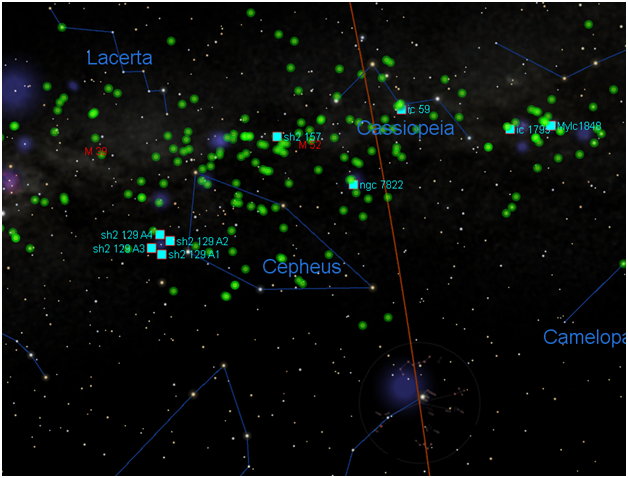
Display Issues
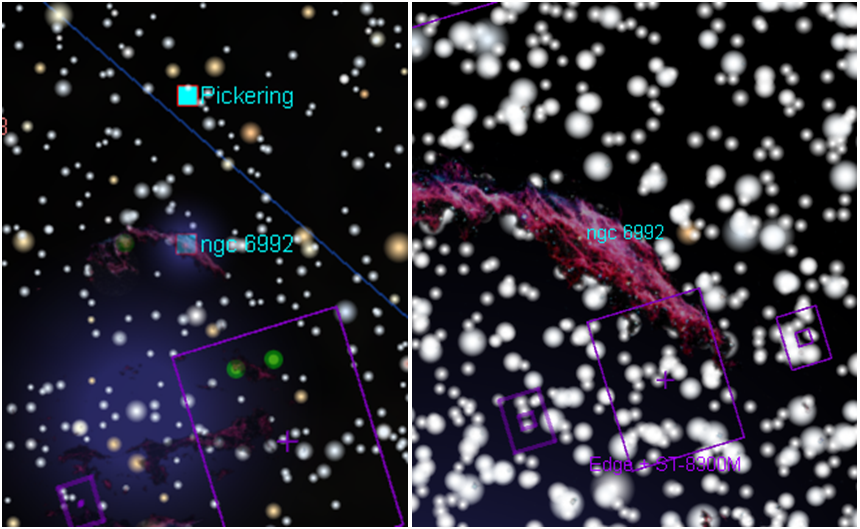
The labels should show up all of the time. The symbols sometimes have funny colors. They may get OR’d with another symbol on the screen, or hide behind object images on the sky. The appearance changes with zoom magnification.
In the example below, the Pickering target shows fine. The NGC 6992 symbol can be seen but is dimmer than normal due to the picture image. When the chart is zoomed in, the symbol disappears completely behind the image shown by TheSkyX.
Repeat:
Over time, you will add and/or delete targets in Scheduler. Repeat Steps 2-4 to update the display in TheSkyX.
